snowman roll and cover
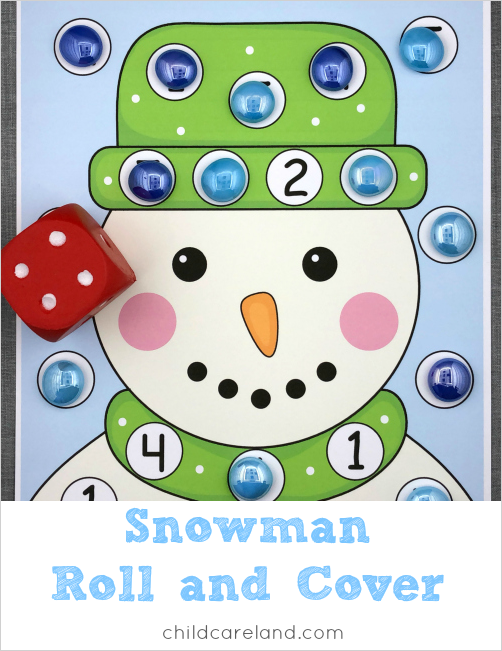
I made a snowman roll and cover mat to work on math and fine motor skills. I printed the mat on cardstock paper and laminated it. I then set it out with dice and glass cover-ups.
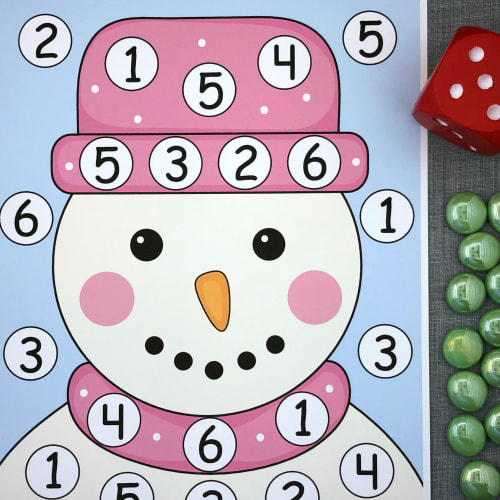
In this activity children roll the dice and cover up the same number on the snowman mat. Play continues until all numbers have been covered. I made both numbers 1-6 and 2-12 (roll two dice and add) mats. Click the link below to download.
snowman roll and cover
15 Comments
The free membership printable this week is mitten match and clip which is great for color recognition and fine motor development. I printed the patterns on cardstock paper ... cut them out and laminated them.
I cut white yarn into six inch pieces and tied the ends to large white plastic coated paper clips. I set them out along with the mittens that I had mixed up. You can also just use paper clips without the yarn and even clothespins.
In this activity children find the two mittens that match and clip them together. I have included four different sets of color mittens so you have a variety to choose from.
You can grab the patterns for free until Sunday January 15th ... after that they will only be available in the member's section which is also where I have added winter learning friends matching mats.
I made a hat and mitten match for the children to work on today. I printed the patterns on cardstock paper ... cut everything out ... and then laminated all of the pieces.
I set the hats out in one pile and the mittens in another pile. The children spread the hats out on the table and then put the same color pair of mittens next to each hat. There are ten different colors included with this set.
As an option the children also were given clothespins to clip their matching pieces together. You can grab the patterns for this activity here.
We are working on our snowman theme this week and a I put together a felt snowman activity that the children really enjoyed. I had previously purchased felt pieces from michaels craft store so I already had quite a stash built up. They are inexpensive but sometimes they have sales that make them worth buying even if do not need any at the time.
I free cut all of the pieces using a really good pair of scissors. I made three different sized circles for the snowman out of white felt. I then made arms (twig shaped) ... mittens ... a scarf ... a hat and a broom. I also made the eyes ... mouth and nose.
I set all of the snowman pieces out in a center and the children put them together deciding which piece went where. They could work individually or in pairs. Once the snowman was built the children decided on a name and talked about why snow forms and what will happens to snow when it gets warmer. They then took the snowman apart for the next child to work on.
You can see a video of this activity below:
The free membership printable this week is snowman color match and clip which is great for clolor recognition and review as well as fine motor development. I printed all the patterns on cardstock paper and cut them out.
I laminated all of the pieces and set them out in a basket along twelve with clothespins. I made sure I had two different stacks of color cards for the children to look through. You can set you match up any way you wish.
In this activity children find the cards with the same colors and clip them together with clothespins. You can do a snowman to snowman match ... a snowman to color circle match ... an a color circle to color circle match. You can grab the patterns for free until Sunday January 10th ... after that they will only be available in the member's section which is where the snowman cubby/locker tags are.
We do a lot of learning activities outside when weather permits and this week we worked with colored ice balls. They were easy to make ... the children loved them ... and they looked awesome in the snow!! We did counting and sorting for specific activities and then the children took the ice balls and played with them in the snow. They made shapes ... buried them ... lined them up and really had an great time with them. I used liquid water color instead of food coloring for the ice balls. The ice balls will stain children's hands but the water color paint will wash out easier than food coloring. Because we were outside the children had mittens and gloves on for most of the time they were working with the ice balls. I also had special scooper tools that were perfect for picking up the ice balls. I purchased a special silicone ice ball mold and filled it up with colored water that I had mixed together in a squeeze bottle. I didn't put a specific amount of the liquid paint in ... I just put enough in until I liked the color of the water. The mold makes four ice balls of the same color at a time and it takes between four to five hours for them to freeze. One they are frozen I removed them from the mold and placed them in zip lock bags with each color having their own bag. When we were ready to go outside I put all of the ice balls in clear plastic bowls (I had three ice centers set up) and added a special scoop that that is from a fine motor skills tool kit that I really love. The children used clear plastic cups as well as muffin tins to sort and count the ice balls. You can see a video of this activity by clicking below: |
Search My SiteArchives
March 2021
Categories
All
|